Yoga can challenge the muscles around your abdomen, back and hips while asking you to control your balance and movement. These five yoga poses for core strength range from accessible options to more demanding balances. You can practise the easier versions first and progress at a pace that feels manageable.
You do not need special equipment. A yoga mat and a little open floor space are enough. Move slowly, keep breathing, and stop if you feel sharp pain, numbness or unusual discomfort.
What Does “Core Strength” Mean?
Your core includes more than your abdominal muscles. It involves muscles around your trunk and pelvis that help steady your body as you move. In yoga, these muscles work to help you maintain balance, control your posture and move your arms and legs with stability.
Core exercises do not selectively remove fat from the abdomen, and no single pose can guarantee a particular body shape or prevent back pain. The poses below are ways to practise strength and control as part of a broader movement routine.
1. Locust Pose (Salabhasana)
Locust Pose is practised lying on your front. It asks the muscles along your back, hips and legs to help lift and steady your upper or lower body. Start with a small lift; height is not the goal.
How to practise
- Lie face down on your mat with your legs extended behind you. Keep them hip-width apart or closer together, whichever feels more comfortable.
- Rest your forehead on the mat and lengthen the back of your neck.
- Place your arms alongside your body, with your palms facing down or toward each other.
- Gently press the tops of your feet and the front of your pelvis into the mat.
- On an inhale, lift your chest a little while keeping your neck long. Keep your gaze down rather than lifting your chin.
- If that feels comfortable, lift one or both legs slightly without twisting your pelvis or straining your lower back.
- Take a comfortable breath, then lower slowly.
Beginner option
Keep your chest down and lift one leg at a time, or lift your chest while keeping both legs on the mat. Choose the version that lets you breathe comfortably.
Common mistake
Avoid trying to lift as high as possible by compressing your lower back or throwing your head back. A small, controlled lift is enough to practise the pose.

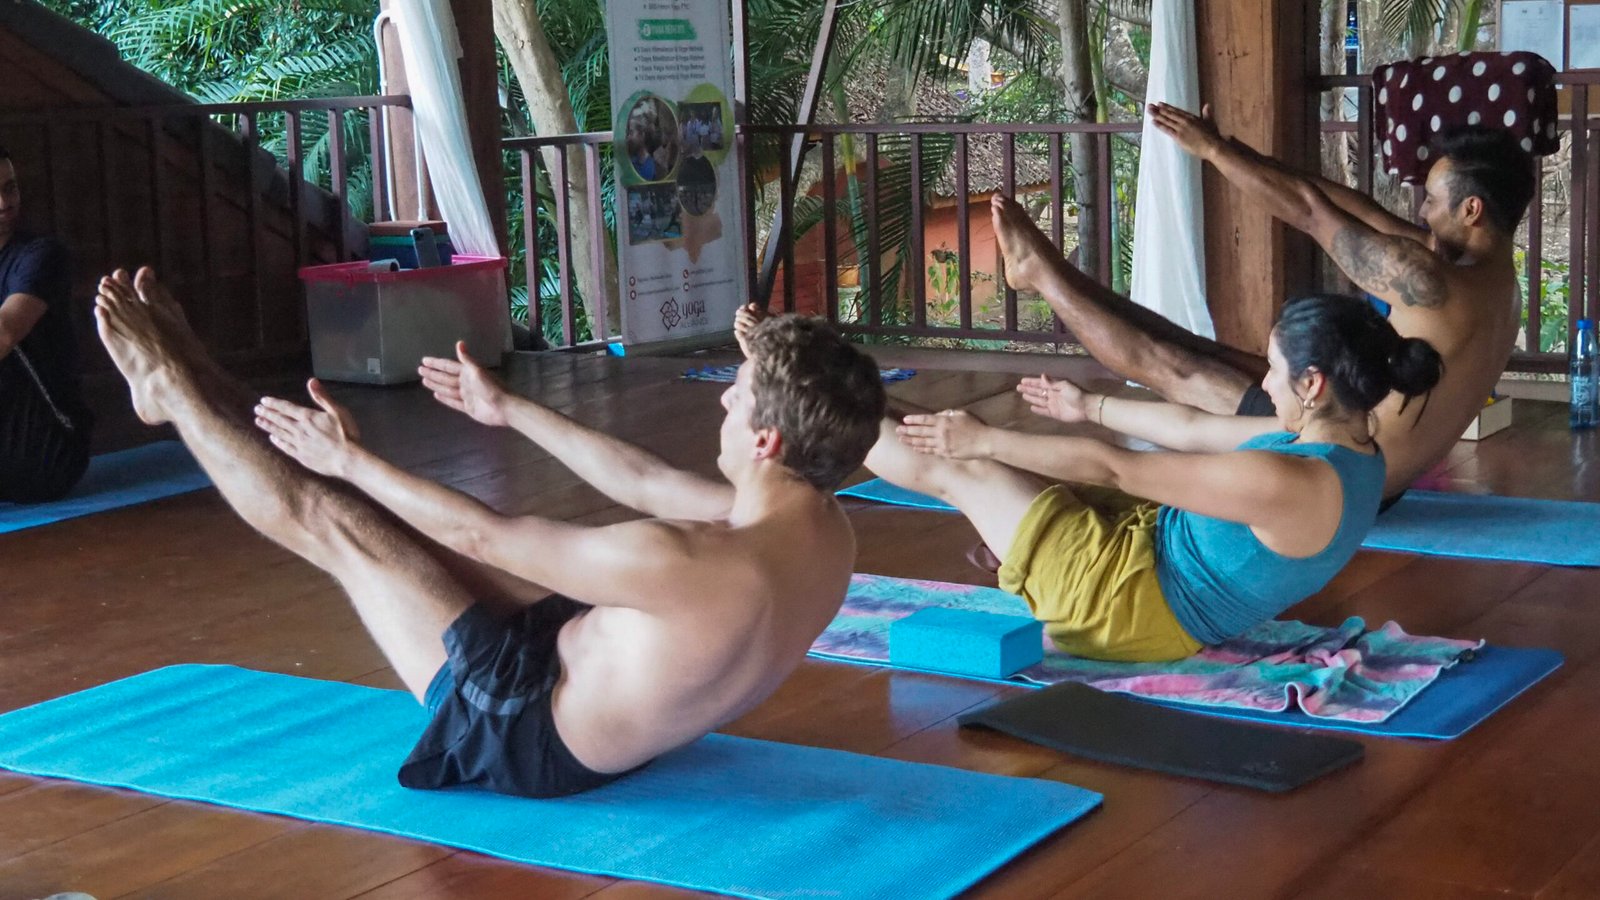
2. Boat Pose (Navasana)
Boat Pose challenges your trunk control while you balance on your sitting bones. Bent knees are a useful starting point. You do not need to straighten your legs to practise the pose.
For a more detailed explanation, see our guide to the physical and mental benefits of Boat Pose.
How to practise
- Sit with your knees bent and feet on the mat. Place your hands behind your thighs.
- Sit tall and lengthen your spine. Lean back slightly while keeping your chest lifted.
- Hold the backs of your thighs and raise one foot, then the other, until your shins are roughly parallel to the floor.
- Stay here, or reach your arms forward at about shoulder height.
- Keep your shoulders relaxed and breathe steadily. If your back rounds or you cannot breathe comfortably, bend your knees more or lower your feet.
- To come out, place your feet down gently and sit upright.
Beginner option
Keep your toes on the floor and lean back only a little. You can also hold behind your thighs throughout the pose.
Common mistake
Do not pull yourself into a straight-leg position if it causes your back to round or your shoulders to tense. A steady bent-knee version is a useful practice.
3. Warrior III (Virabhadrasana III)
The original article calls this section “Nauka Asana,” but its standing-on-one-leg description matches Warrior III more closely. In this balancing pose, your trunk helps steady you as your torso and lifted leg extend in opposite directions.
How to practise
- Stand near a wall or a sturdy chair so you can use it for support.
- Place your feet about hip-width apart and soften your knees.
- Shift your weight onto your right foot. Keep a slight bend in that knee.
- Hinge forward from your hips as you extend your left leg behind you.
- Keep your chest and lifted leg reaching in opposite directions. Let your hips turn toward the floor rather than opening out to the side.
- Keep your hands on your hips, reach them forward, or rest them lightly on a wall for balance.
- Hold for a few comfortable breaths, then lower your left foot with control. Repeat on the other side.
Beginner option
Keep your fingertips on a wall or the back of a chair. You can also practise the hip hinge with both feet on the floor before lifting a leg.
Common mistake
Avoid twisting your hips open or locking the standing knee. Focus on length through your spine and a level, steady pelvis.
4. Crow Pose (Bakasana)
Crow Pose is an arm balance that requires coordination and confidence as well as strength. It is more challenging than the other poses in this list, so beginners can practise the weight-shifting preparation before attempting to lift their feet.
How to practise
- Begin in a low squat with your feet close together or slightly apart.
- Place your hands on the mat in front of you, about shoulder-width apart. Spread your fingers and press through your palms.
- Bend your elbows slightly. Bring your knees toward the backs of your upper arms, close to the armpits if that is comfortable.
- Look at a point on the floor a little ahead of your hands, not directly between them.
- Lean your shoulders forward gradually while keeping your fingertips active against the mat.
- First practise lifting one foot just a little. If you feel balanced, try lifting the other foot.
- Keep breathing. To come down, lower one foot and then the other with control.
Beginner option
Keep both feet on the floor and practise shifting your shoulders forward and back. You can also place a folded blanket in front of you as a soft landing area while learning.
If you want a separate progression, see our guide to Crow Pose for beginners.
Common mistake
Do not rush to lift both feet or look straight down between your hands. Move gradually, keep your gaze slightly forward, and stop if your wrists or shoulders hurt.

5. Four-Limbed Staff Pose (Chaturanga Dandasana)
Chaturanga is a demanding plank variation. The original article describes bending the elbows from plank, but beginners may find a knees-down version easier to control. You can also stay in Plank Pose instead of lowering.
How to practise
- Begin in Plank Pose with your hands under your shoulders. Press the mat away and lengthen through your heels.
- Draw your abdomen gently inward while continuing to breathe. Keep your body in one long line.
- If you are practising Chaturanga, shift your shoulders slightly forward and bend your elbows close to your sides.
- Lower only as far as you can while keeping control. Your shoulders should not drop below your elbows.
- Press through your hands to return to Plank, or lower your knees to the mat.
- Rest in Child’s Pose or another comfortable position before repeating.
Beginner option
Lower your knees before bending your elbows. Keep your torso and hips aligned as you lower only a small distance. If that still feels difficult, hold a knees-down plank instead.
Common mistake
Avoid letting your hips sag, flaring your elbows wide or lowering too far. If you cannot keep the movement controlled, stay in Plank or rest.
A Simple Way to Practise These Poses
You do not need to perform all five poses in one session. Start with two or three that feel appropriate for your experience:
- Practise Locust Pose with a small lift.
- Try Boat Pose with bent knees.
- Choose either the supported Warrior III preparation or a plank variation.
- Rest between poses and breathe normally.
- Add Crow Pose or the full Chaturanga only when you feel ready to practise those options with control.
Repeat a pose only while you can maintain comfortable breathing and steady form. Progress can mean holding a position with more control, using less support, or practising a slightly longer hold. It does not have to mean choosing the most difficult variation.
Common Mistakes to Avoid
- Holding your breath: Keep breathing smoothly. Come out of the pose if you cannot breathe comfortably.
- Chasing the full pose too soon: Bent knees, a wall or knees-down variations can help you build control.
- Using momentum: Move in and out slowly so you can notice how your body responds.
- Ignoring discomfort: Muscle effort can be expected, but sharp pain, numbness or a sudden increase in discomfort is a reason to stop.
- Treating every pose as suitable for everyone: Your experience, mobility and health history affect which variations are appropriate.
Safety Tips
Practise on a stable, non-slip surface and give yourself enough room to move. If you are new to yoga, a qualified teacher can help you learn the poses and choose suitable modifications.
If you are pregnant, have a health condition, balance concerns, or a current or previous injury, ask a qualified health professional or yoga teacher about appropriate modifications before trying challenging balances or weight-bearing poses. Stop if a pose causes pain or feels unsafe.
Frequently Asked Questions
Can beginners practise yoga for core strengthening?
Yes. Beginners can start with supported versions, such as bent-knee Boat Pose, a small Locust lift, Warrior III with a wall, and a knees-down plank. Crow Pose and full Chaturanga are more demanding and can be left for later.
How long should I hold each pose?
There is no single hold time that suits everyone. Begin with a few comfortable breaths, keep breathing, and come out when you lose control or feel discomfort. A yoga teacher can help tailor the practice to your experience.
Do these yoga poses reduce belly fat?
These poses can challenge muscles used to stabilise the trunk, but they cannot target fat loss from one specific area. Avoid treating a single pose or short sequence as a guaranteed way to change body shape.
Should I practise these poses if I have back pain?
These poses are not a treatment for back pain, and the right choice depends on its cause and your health history. If you have back pain, an injury, or symptoms that concern you, speak with a qualified health professional before trying the poses.
Build Core Strength with Steady Practice
These five yoga poses offer different ways to practise balance, trunk control and strength. Begin with the versions you can perform comfortably, breathe throughout, and progress gradually. Consistent, controlled practice matters more than forcing a pose.